intensity-normalization


This package contains various methods to normalize the intensity of various modalities of magnetic resonance (MR) images, e.g., T1-weighted (T1-w), T2-weighted (T2-w), FLuid-Attenuated Inversion Recovery (FLAIR), and Proton Density-weighted (PD-w).
The basic functionality of this package can be summarized in the following image:
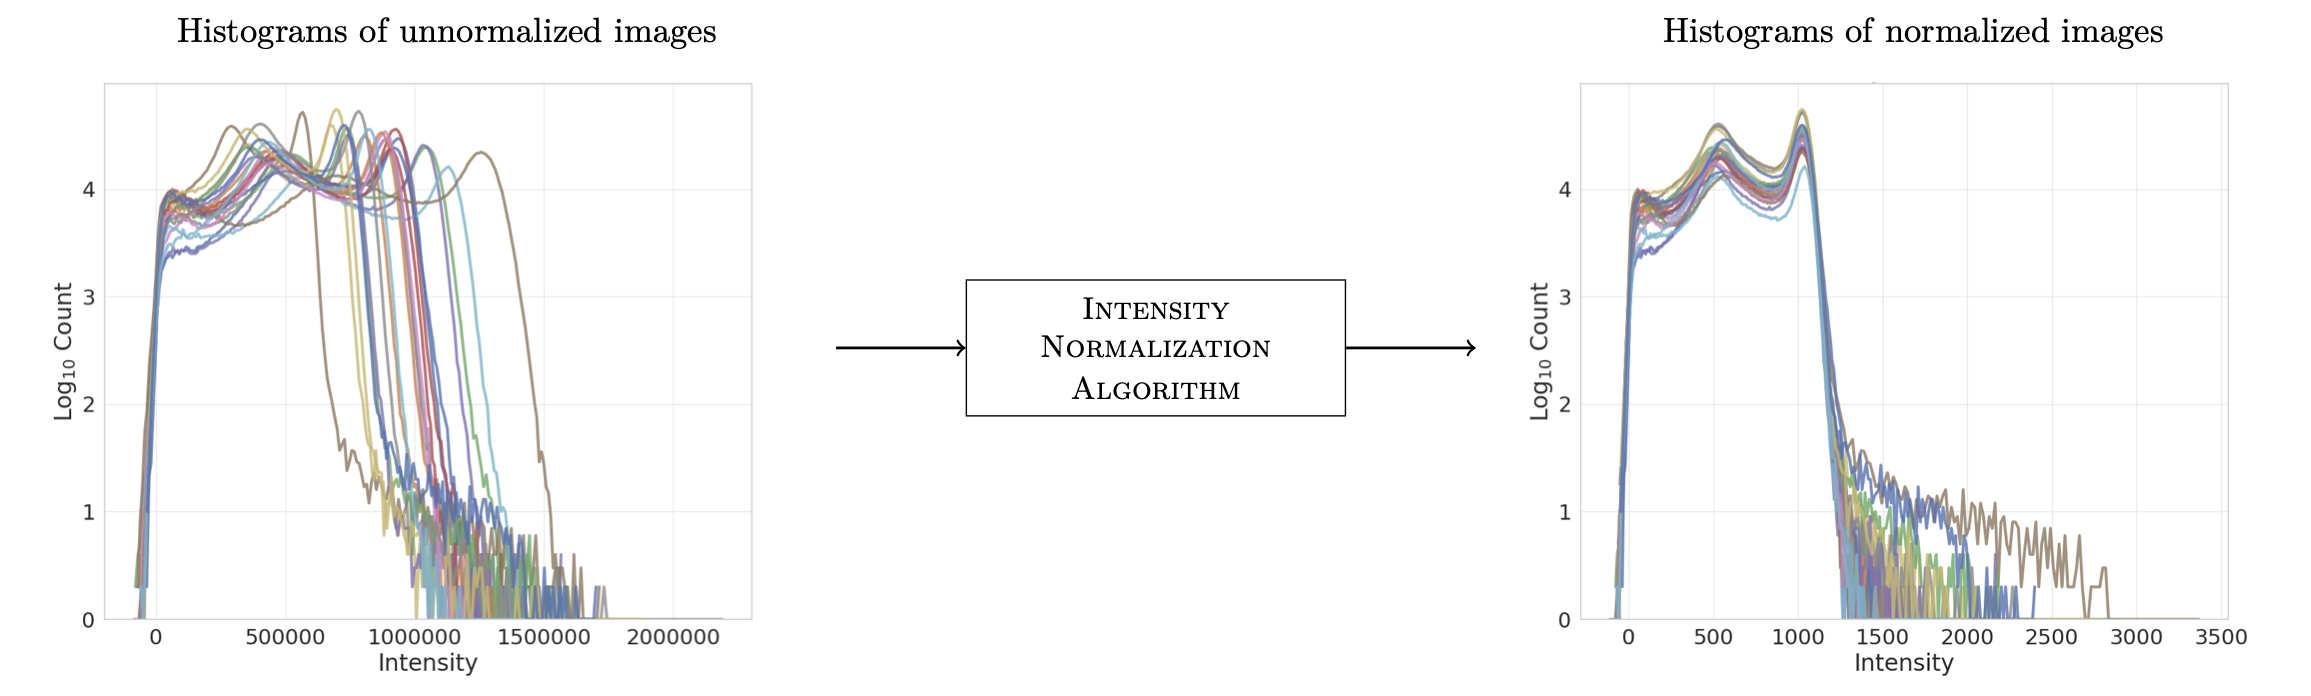
where the left-hand side are the histograms of the intensities for a set of unnormalized images (from the same scanner with the same protocol!) and the right-hand side are the histograms after (FCM) normalization.
We used this package to explore the impact of intensity normalization on a synthesis task (pre-print available here).
Note that while this release was carefully inspected, there may be bugs. Please submit an issue if you encounter a problem.
Methods
We implement the following normalization methods (the names of the corresponding command-line interfaces are to the right in parentheses):
Individual time-point normalization methods
Z-score normalization (
zscore-normalize)Fuzzy C-means (FCM)-based tissue-based mean normalization (
fcm-normalize)Kernel Density Estimate (KDE) WM mode normalization (
kde-normalize)WhiteStripe [1] (
ws-normalize)
Sample-based normalization methods
Least squares (LSQ) tissue mean normalization (
lsq-normalize)Piecewise Linear Histogram Matching (Nyúl & Udupa) [2] [3] (
nyul-normalize)RAVEL [4] (
ravel-normalize)
Individual image-based methods normalize images based on one time-point of one subject.
Sample-based methods normalize images based on a set of images of (usually) multiple subjects of the same modality.
Recommendation on where to start: If you are unsure which one to choose for your application, try FCM-based WM-based normalization (assuming you have access to a T1-w image for all the time-points). If you are getting odd results in non-WM tissues, try least squares tissue normalization (which minimizes the least squares distance between CSF, GM, and WM tissue means within a set).
Read about the methods and how they work.
If you have a non-standard modality, e.g., a contrast-enhanced image, read about how the methods work and
determine which method would work for your use case. Make sure you plot the foreground intensities (with
the -p option in the CLI or the HistogramPlotter in the Python API) to validate the normalization results.
All algorithms except Z-score (zscore-normalize) and the Piecewise Linear Histogram Matching
(nyul-normalize) are specific to images of the brain.
Motivation
Intensity normalization is an important pre-processing step in many image processing applications regarding MR images since MR images have an inconsistent intensity scale across (and within) sites and scanners due to, e.g.,:
the use of different equipment,
different pulse sequences and scan parameters,
and a different environment in which the machine is located.
Importantly, the inconsistency in intensities isn’t a feature of the data (unless you want to classify the scanner/site from which an image came)—it’s an artifact of the acquisition process. The inconsistency causes a problem with machine learning-based image processing methods, which usually assume the data was gathered iid from some distribution.
Install
The easiest way to install the package is through the following command:
pip install intensity-normalization
To install from the source directory, clone the repo and run:
python setup.py install
Note the package antspy is required for the RAVEL normalization routine, the preprocessing tool as well as the co-registration tool, but all other normalization and processing tools work without it. To install the antspy package along with the RAVEL, preprocessing, and co-registration CLI, install with:
pip install "intensity-normalization[ants]"
Basic Usage
See the 5 minute overview for a more detailed tutorial.
In addition to the above small tutorial, here is consolidated documentation.
Call any executable script with the -h flag to see more detailed instructions about the proper call.
Note that brain masks (or already skull-stripped images) are required for most of the normalization methods. The brain masks do not need to be perfect, but each mask needs to remove most of the tissue outside the brain. Assuming you have T1-w images for each subject, an easy and robust method for skull-stripping is ROBEX [5].
If the images are already skull-stripped, you don’t need to provide a brain mask. The foreground will be automatically estimated and used.
You can install ROBEX—and get python bindings for it at the same time–with the
package pyrobex (installable via pip install pyrobex).
Individual time-point normalization methods
Example call to a individual time-point normalization CLI:
fcm-normalize t1w_image.nii -m brain_mask.nii
Sample-based normalization methods
Example call to a sample-based normalization CLI:
nyul-normalize images/ -m masks/ -o nyul_normalized/ -v
where images/ is a directory full of N MR images and masks/ is a directory full of N corresponding brain masks,
nyul_normalized is the output directory for the normalized images, and -v controls the verbosity of the output.
The command line interface is standard across all sampled-based normalization routines (i.e., you should be able to run all sample-based normalization routines with the same call as in the above example); however, each has unique method-specific options.
Potential Pitfalls
This package was developed to process adult human MR images; neonatal, pediatric, and animal MR images should also work but—if the data has different proportions of tissues or differences in relative intensity among tissue types compared with adults—the normalization may fail. The
nyul-normalizemethod, in particular, will fail hard if you train it on adult data and test it on non-adult data (or vice versa). Please open an issue if you encounter a problem with the package when normalizing non-adult human data.When we refer to any specific modality, it is referring to a non-contrast version unless otherwise stated. Using a contrast image as input to a method that assumes non-contrast will produce suboptimal results. One potential way to normalize contrast images with this package is to 1) find a tissue that is not affected by the contrast (e.g., grey matter) and normalize based on some summary statistic of that (where the tissue mask was found on a non-contrast image); 2) use a simplistic (but non-robust) method like Z-score normalization.
Read about the methods and how they work to decide which method would work best for your contrast-enhanced images.
Contributing
Help wanted! See CONTRIBUTING.rst for details and/or reach out to me if you’d like to contribute. Credit will be given! If you want to add a method, I’ll be happy to add your reference to the citation section below.
Test Package
Unit tests can be run from the main directory as follows:
pytest tests
Citation
If you use the intensity-normalization package in an academic paper, please cite the
corresponding paper:
@inproceedings{reinhold2019evaluating,
  title={Evaluating the impact of intensity normalization on {MR} image synthesis},
  author={Reinhold, Jacob C and Dewey, Blake E and Carass, Aaron and Prince, Jerry L},
  booktitle={Medical Imaging 2019: Image Processing},
  volume={10949},
  pages={109493H},
  year={2019},
  organization={International Society for Optics and Photonics}}